Creating festive wall art yourself is a rewarding way to add a personal touch to your holiday decor. Whether you’re gearing up for Christmas, Halloween, Eid, or any festive occasion, DIY projects can bring a unique charm to your celebrations. Here’s a guide to help you craft beautiful, personalized wall art that will enhance the festive spirit in your home.
1. Choose Your Theme
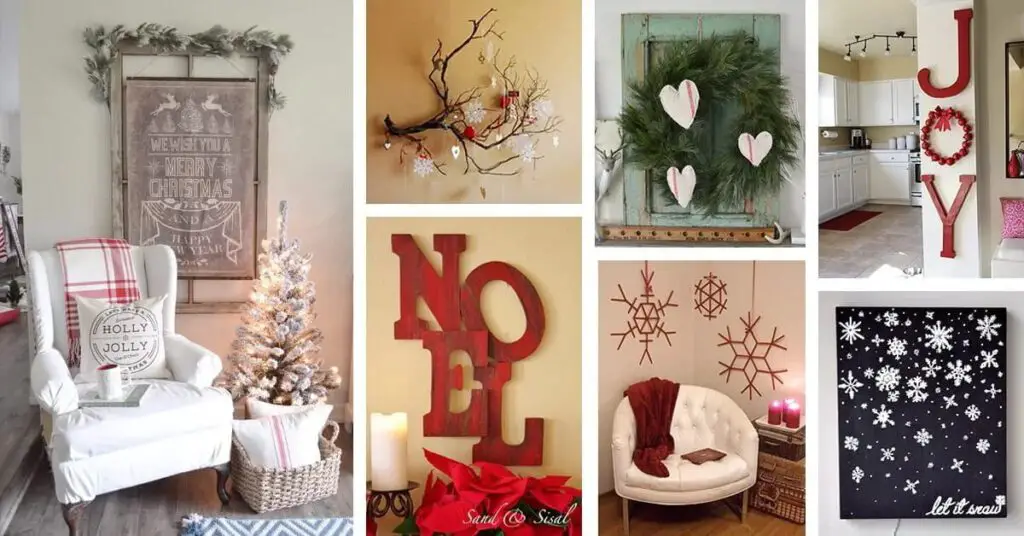
Start by selecting a theme that matches the festivity. For Christmas, you might opt for snowflakes, stars, or Santa motifs. If you’re decorating for Halloween, think about pumpkins, ghosts, or eerie landscapes. Choosing a theme helps you focus your ideas and makes the shopping for materials more straightforward.
2. Gather Your Materials
Once you have your theme, collect the materials you’ll need. Common supplies include:
- Construction paper or cardstock
- Paints and brushes
- Scissors and glue
- Fabric scraps
- Ribbons and beads
- Glitter and sequins
- Old magazines and newspapers for collages
You can find these materials at craft stores or repurpose items you already have at home, making your project eco-friendly and cost-effective.
3. Design Your Layout
Sketch your design on paper before you start. Plan the size and placement of each element in your artwork. This step ensures that the final product is balanced and visually appealing. Don’t be afraid to experiment with different layouts until you find one that feels right.
4. Create Your Art
Now, the fun part—bringing your design to life:
- Painting and Drawing: Use brushes, sponges, or even your fingers to paint on canvas or paper. Freehand designs work well, or you can use stencils for more precise shapes.
- Collage: This is great for all ages. Cut out pictures and patterns from old magazines and arrange them creatively. Glue them onto a larger paper or canvas.
- Fabric Art: Fabric scraps can be arranged and glued or sewn onto a canvas to create textured, colorful wall hangings.
- Mixed Media: Combine several techniques for an eclectic and tactile effect. For example, paint a background and then glue on objects like buttons, dried flowers, or small ornaments.
5. Add Finishing Touches
Once your main elements are in place, add details that will make your art pop. This could be a touch of glitter, a few strokes of gold paint, or decorative borders. These small additions can make a big difference in the overall effect.
6. Display Your Art
Think about where your art will look best. Consider the lighting, wall color, and nearby decor. Make sure your artwork is securely mounted, especially if it’s heavy or in a high-traffic area. Step back and enjoy your creation, which is not only a beautiful piece of decor but also a reflection of your creativity and effort.
7. Safety Tips
When working with sharp tools like scissors or potentially toxic materials like paint and glue, it’s important to work carefully and maintain a clean workspace. If children are involved, ensure they are using age-appropriate materials and supervise them closely.
Conclusion
DIY festive wall art is not just about decorating your space; it’s about creating memories and enjoying the spirit of the season. Each piece you create will not only add beauty to your home but will also serve as a cherished reminder of your artistic journey. Whether you’re an experienced crafter or a beginner, every project is an opportunity to explore your creativity and make something truly special.
By following these steps and letting your creativity flow, you can create unique and festive decorations that reflect your personal style and add a warm, festive flair to your home.